Sizes and colours under one passport
Last updated September 18, 2026
One passport, many barcodes
A model passport holds the product information that every size and colour shares: composition, care, origin, documents. Each size or colour keeps the barcode printed on its own label. PassportCraft stores those barcodes as entries under the passport, so one passport serves the whole size run and counts once against your plan.
This is different from serial numbers. A Serial Number on a passport identifies one physical item and encodes as /01/{GTIN}/21/{serial}; a size or colour identifies a version of the model and encodes as /01/{its own GTIN}. The two are separate fields and separate concepts. If each unit of your product needs its own record, use the serial number as described in GS1 Digital Link explained.
Sizes and colours are available on Textile / Apparel and General Product passports. Adding or removing them needs the editor role or higher. Viewers see the list with the note "You can view these entries. Ask a workspace owner for editing access."
Step 1: Choose Multiple sizes or colours
In the editor's Product basics chapter, the barcode field opens with the question "Does this product come in multiple versions?"
- One version keeps the familiar single barcode field.
- Multiple sizes or colours turns the same field into the first entry of your size run.
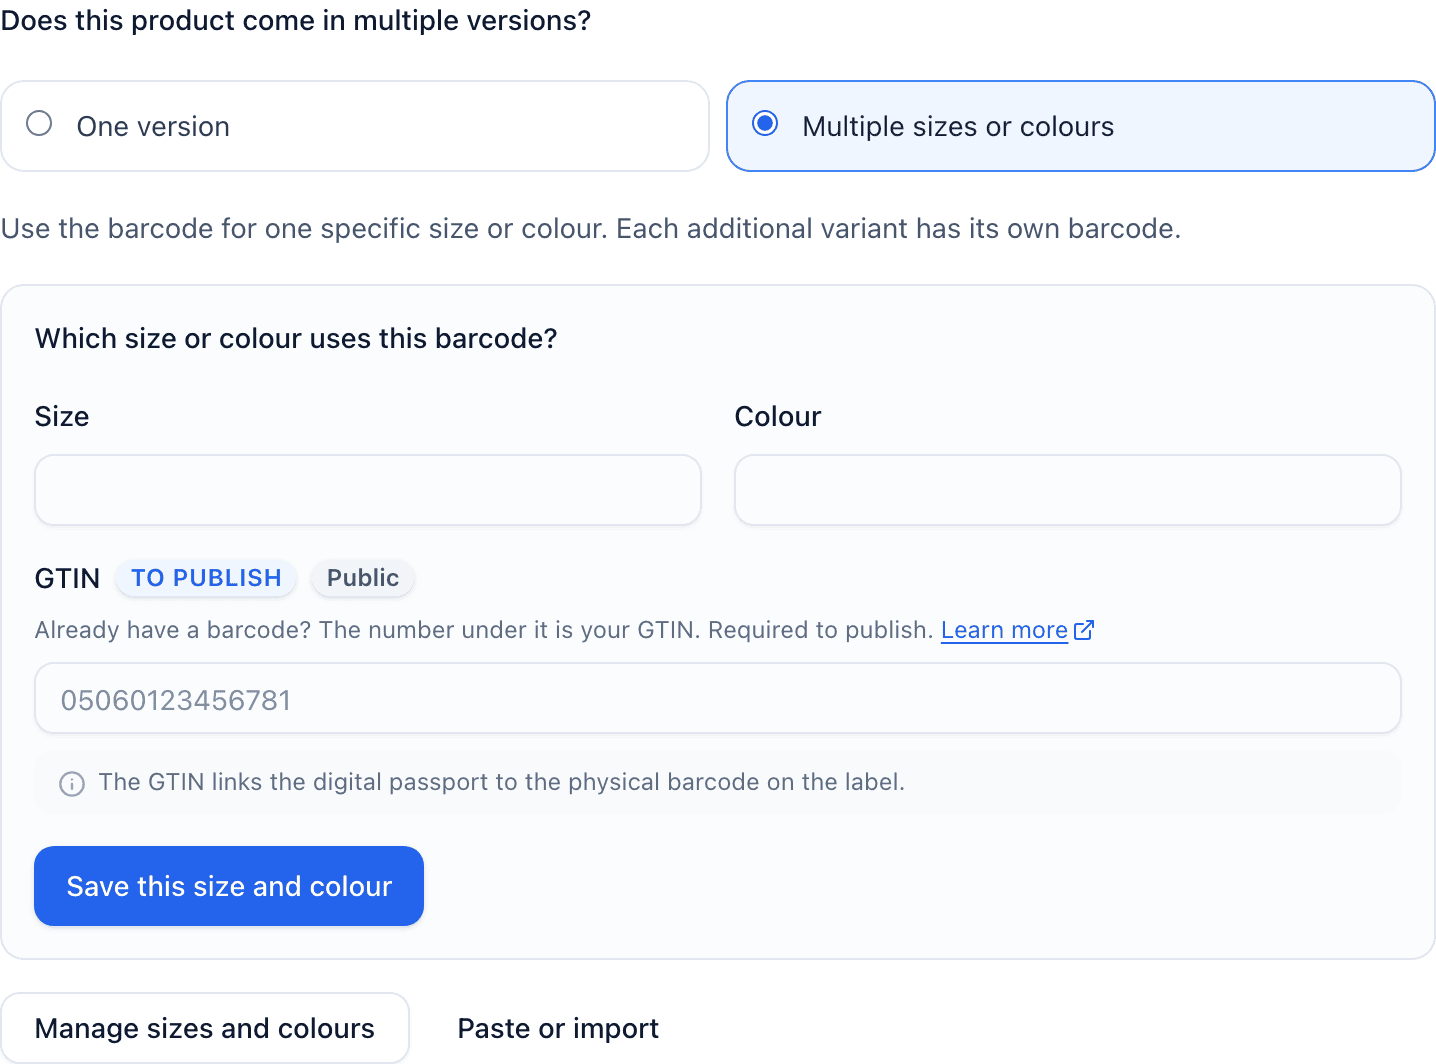
Once at least one entry is saved, One version is no longer selectable: switching back cannot delete saved entries. Choosing Multiple sizes or colours on its own saves nothing; the choice is remembered because entries exist, so a passport with no saved entries opens as One version again.
Step 2: Identify the first barcode
With Multiple sizes or colours selected, the field explains: "Use the barcode for one specific size or colour. Each additional variant has its own barcode." Under "Which size or colour uses this barcode?":
- Enter the Size, the Colour, or both. At least one is needed, each up to 70 characters.
- Enter the barcode in the GTIN field as printed under the barcode: 8, 12, 13 or 14 digits with the check digit.
- Click Save this size and colour.
Any passport edits you have typed are saved first, then the entry is added. The passport keeps this barcode as its own, the standalone GTIN field disappears, and the text changes to "This passport holds the shared product information. Each size or colour below has its own barcode." There is no model-level barcode to invent, and the first entry is not a default: all saved entries are equal.
If you would rather start from a full list, click Paste or import first, add the rows, then pick the passport's own barcode from "Or use a barcode from your saved variants". You never type the same barcode twice.
The entry stays on screen if something goes wrong. "This barcode or size and colour is already assigned differently. Check your saved variants before adding it." means the barcode already carries another size or colour, or that pair already has another barcode. "The passport could not be saved. Your size and colour are kept. Correct any passport errors, then try again." means a passport field failed validation before the entry could be added.
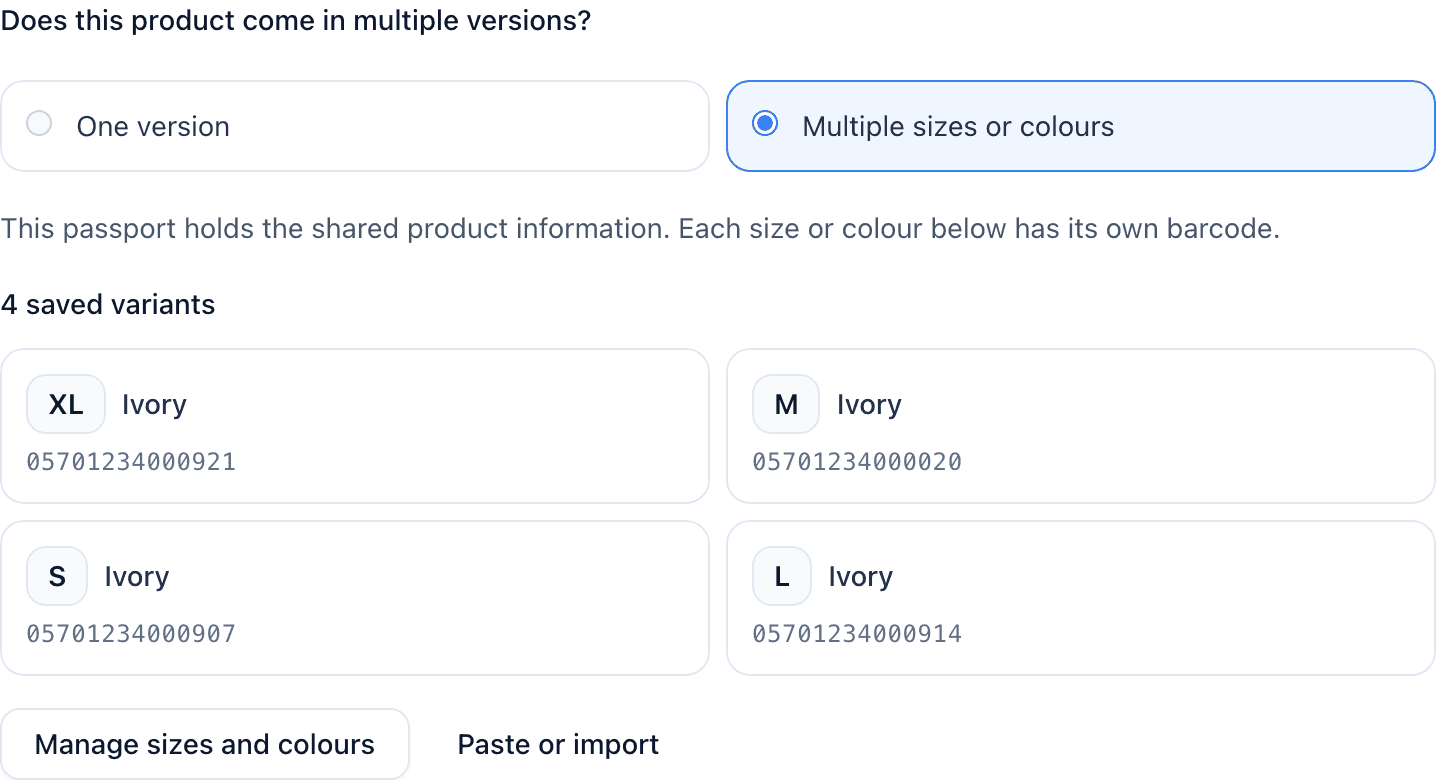
Step 3: Add entries one at a time
Click Manage sizes and colours to open the panel beside the editor. On the One entry tab:
- Enter the Size, the Colour, or both.
- Enter the Barcode (GTIN) assigned to that size or colour.
- Click Add size or colour. The list updates and shows "Entry added."
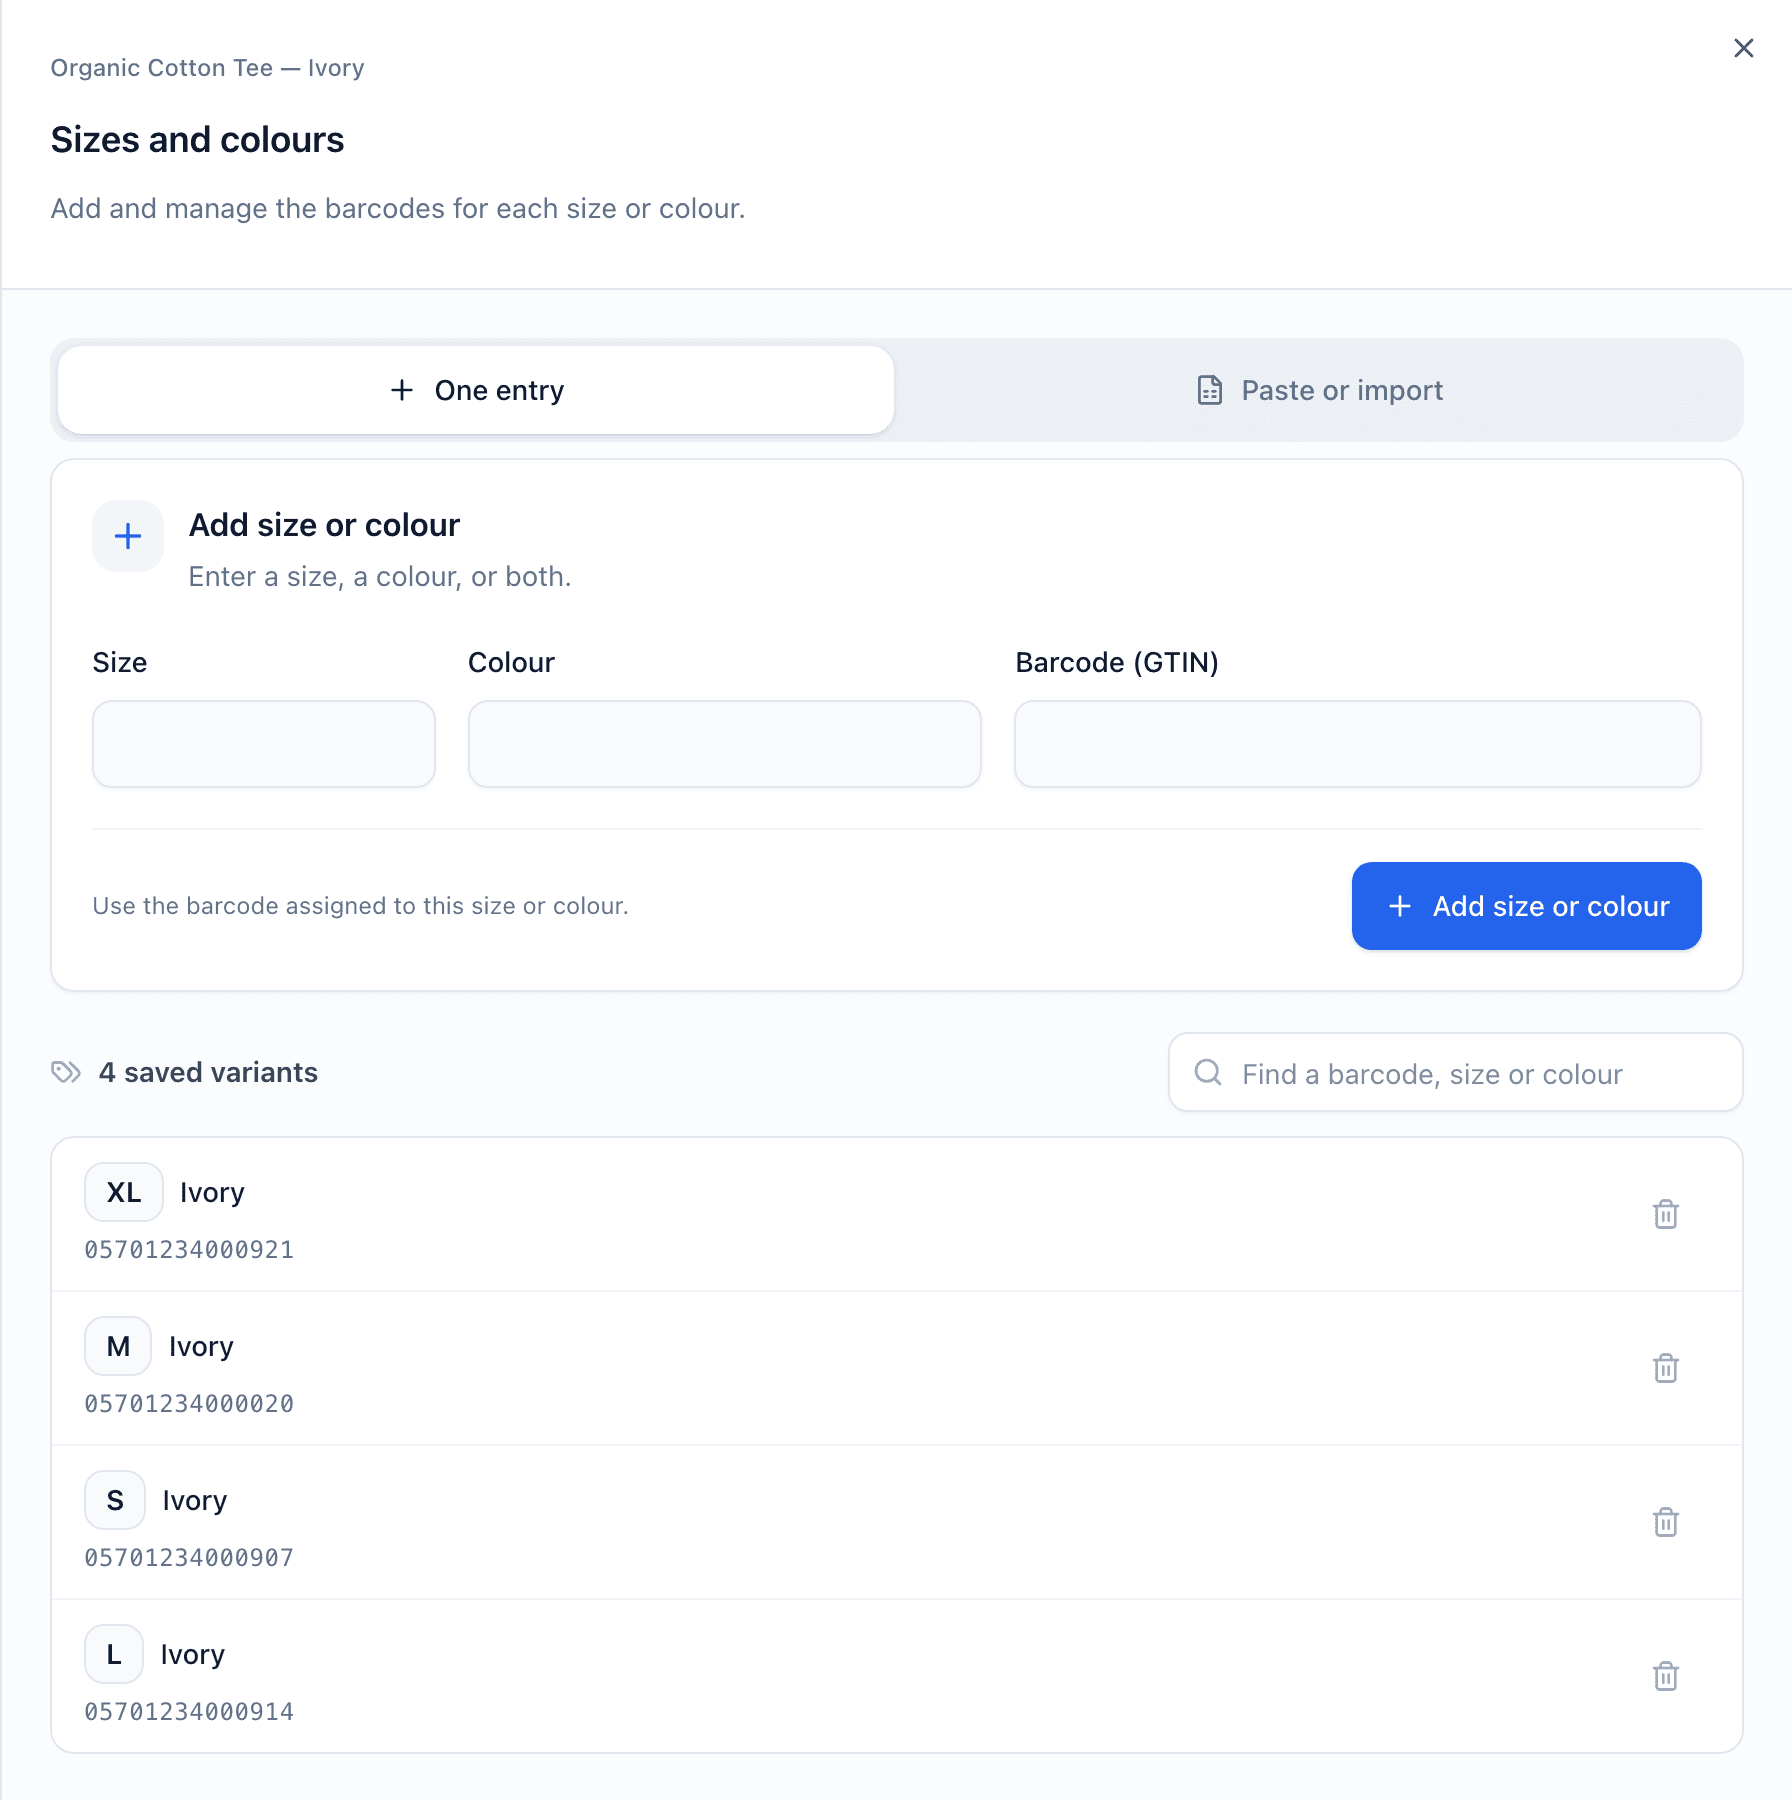
Each entry must differ from the others. The panel refuses a repeat and keeps what you typed:
- "This barcode is already listed." The barcode is already an entry on this passport.
- "This size and colour are already listed." That pair is already an entry, whatever the letter case.
- "This barcode belongs to
{product}." Another passport in your workspace owns the barcode; Open passport takes you to it. - "This passport can hold up to 2000 entries. Remove an entry or create another passport."
Step 4: Paste or import a spreadsheet
For a full size run, open the Paste or import tab. It reads: "Paste rows from a spreadsheet or upload a CSV. Add up to 1000 entries at a time."
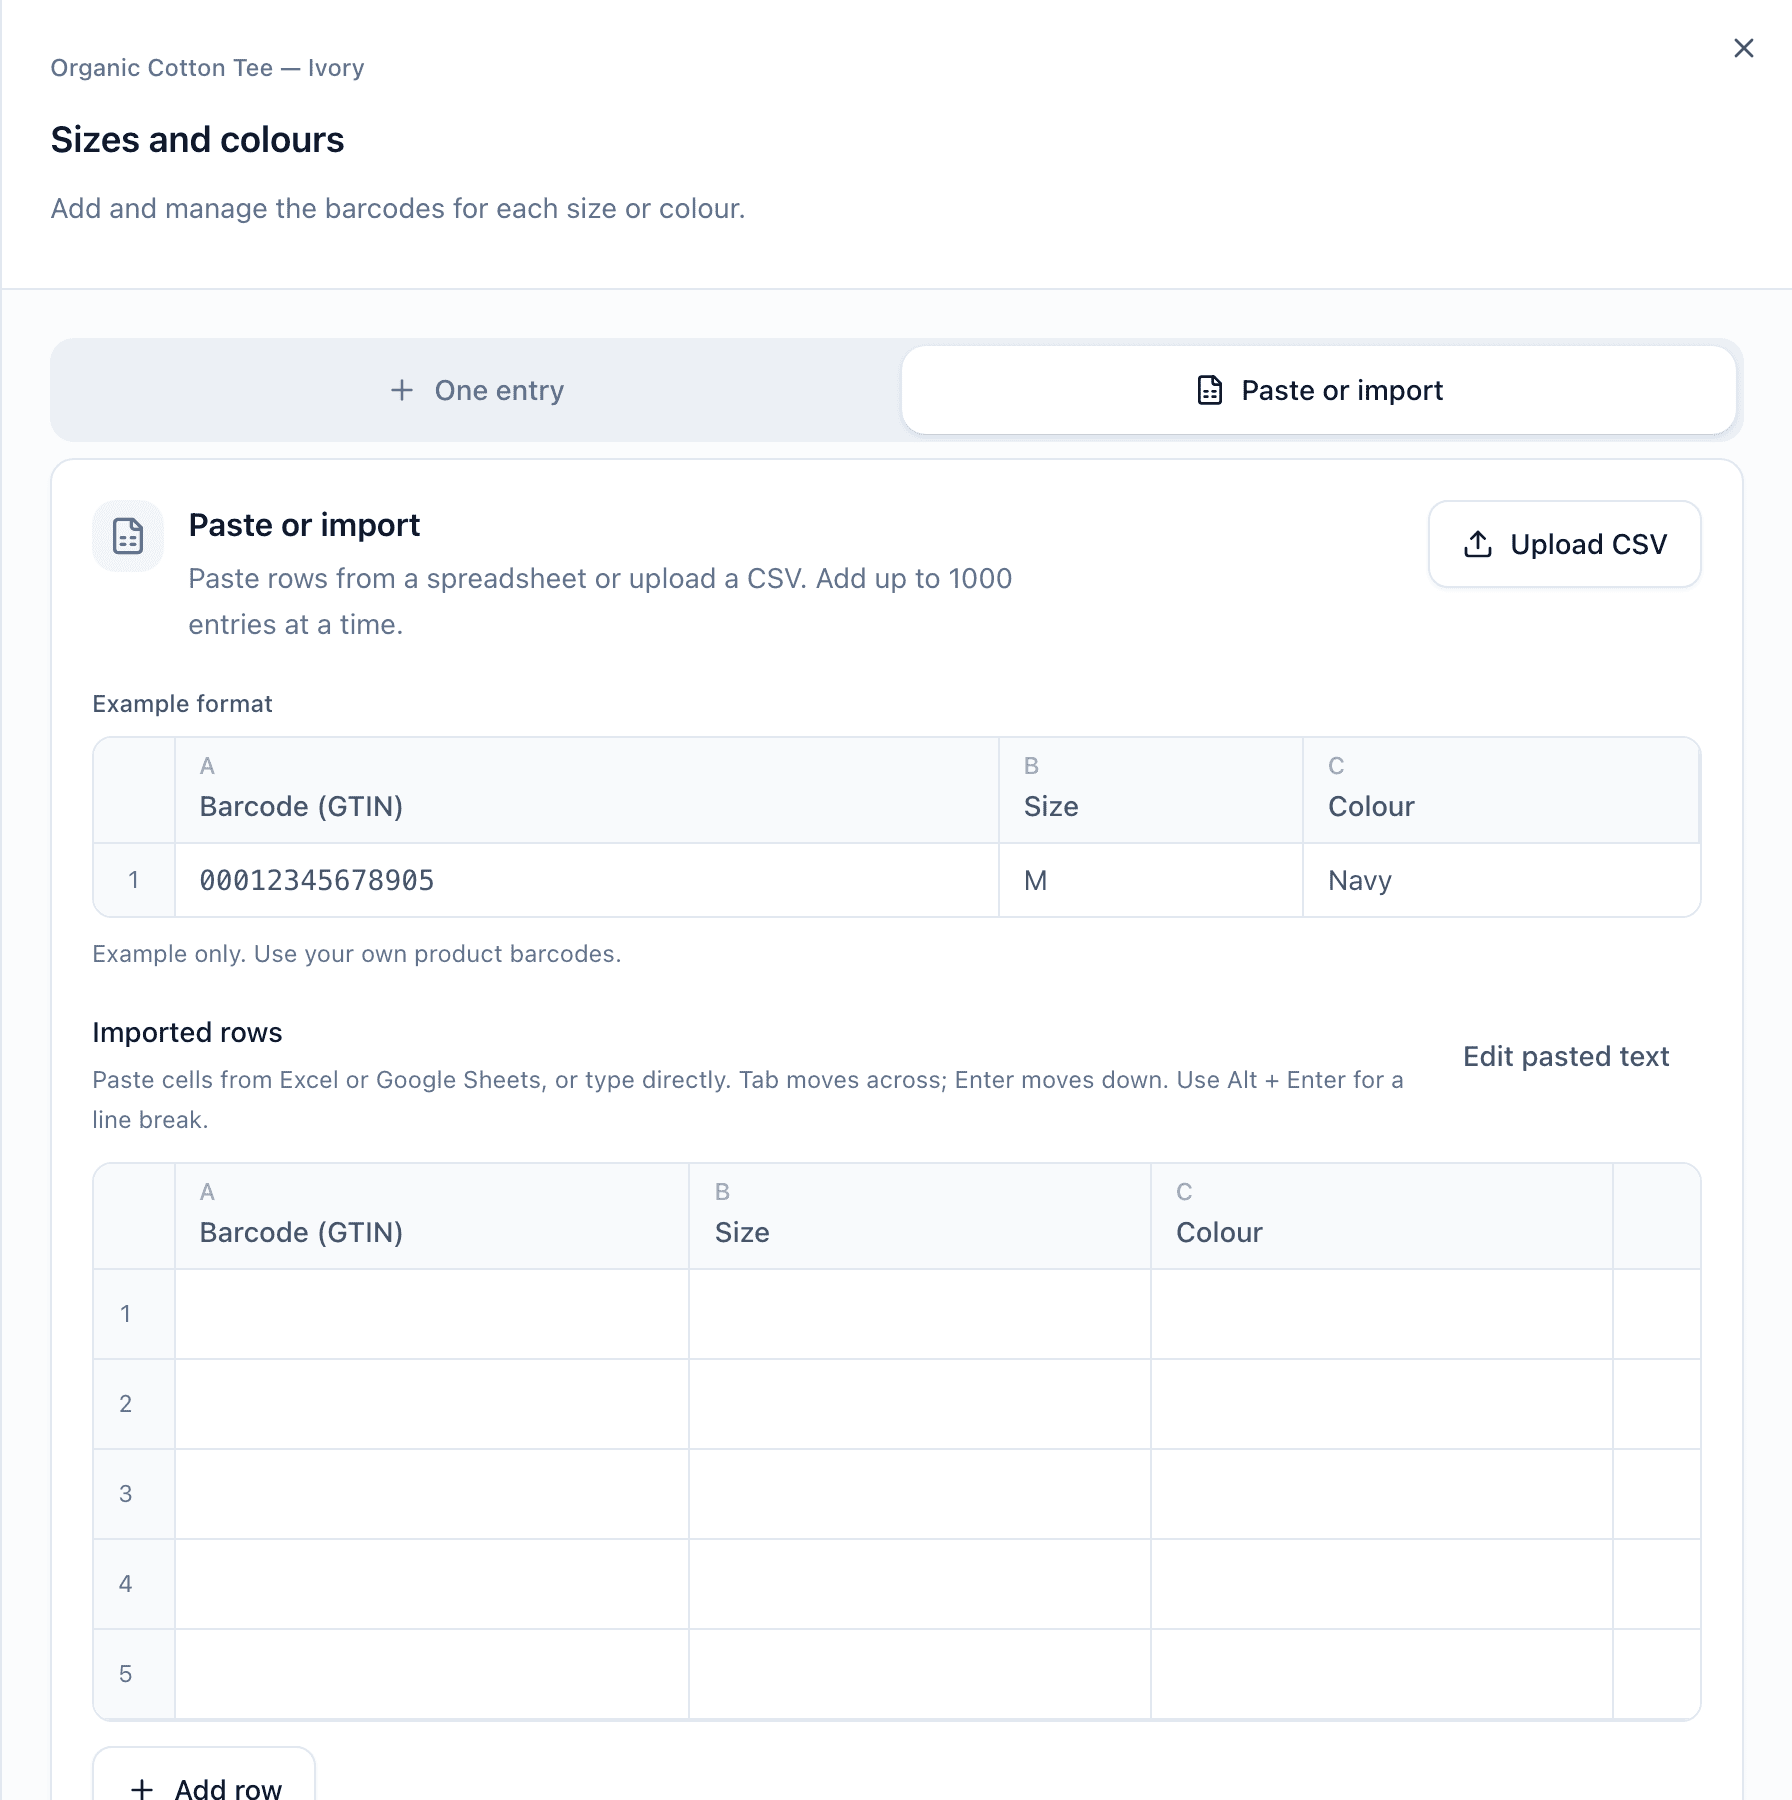
- Prepare three columns in this order: Barcode (GTIN), Size, Colour. A
gtin,size,colourheader row is optional. Format the barcode column as text so leading zeroes survive. - Paste the rows into the grid from Excel or Google Sheets, type into the cells directly, or click Upload CSV for a
.csvfile under 1 MB. Tab moves across, Enter moves down, Alt + Enter adds a line break inside a cell, and Add row appends a row. Edit pasted text shows the raw rows if the columns or quotes need repair; Show as table returns to the grid. - Fix any row the grid flags. Problems are listed under "Fix these problems before adding entries (N)." with the row number, and the Add N entries button stays disabled until the list is empty. A row that exactly matches a saved entry, same barcode and same size and colour, is marked Already added and is skipped rather than refused.
- Click Add N entries. The rows are saved together: if the server refuses any row, none are added, the message names the row, and your cells stay in place for correction. Success shows "N entries added."
A row is refused when its barcode is invalid, when it repeats another row or a saved entry ("This barcode is repeated or already saved."), when its size and colour pair repeats one ("This size and colour combination is repeated or already saved."), or when the batch would take the passport past 2,000 entries. A barcode already saved with a different size or colour is a conflict, not a repeat: correct the row or remove the saved entry first.
Catalogue import is a different tool
Import CSV on the Passports page creates one new draft passport per row. The Paste or import tab here adds sizes and colours to the passport you already have open. Use the catalogue import for many products, and this tab for the barcodes of one product. See Importing products from a CSV.
Saving, counts and removal
Passport fields autosave as you type. Entries do not: each one is saved when you click Save this size and colour, Add size or colour or Add N entries, and the notice confirms it. If you close the panel with text still in the fields, it stays there for the rest of your editor session, unsaved. The panel cannot be closed while a save is in progress.

Once saved, the count appears in three places: Product basics shows N saved variants as equal cards, searchable when there are more than twelve; the panel heading shows the same count with a search box and pages of 25; and the Passports page shows an N variants badge on the product, which opens the full-page version of the same list.
To remove an entry, click its trash icon in the panel, check the barcode, size and colour shown under "Remove this entry?", and click Remove entry. Removing an entry does not change the passport or any other entry. An entry that carries the passport's own barcode can be removed too; the passport keeps its barcode.
Step 5: Download one QR code per barcode
QR codes for sizes and colours live in Review & publish, under the passport's own QR code. The section is headed N variant QR codes.
- Click Download codes to expand the list.
- Choose the File format: SVG · print for labels, PNG · image for digital use. Export options sets the SVG size and PNG resolution, as described in Downloading and printing QR codes.
- Click Download all (N) for a ZIP of every entry, or tick rows and click Download selected (N). For lists over eight rows, a search box and Select this page help you pick; Clear selection returns to all. Each row also has its own Download SVG or Download PNG button.
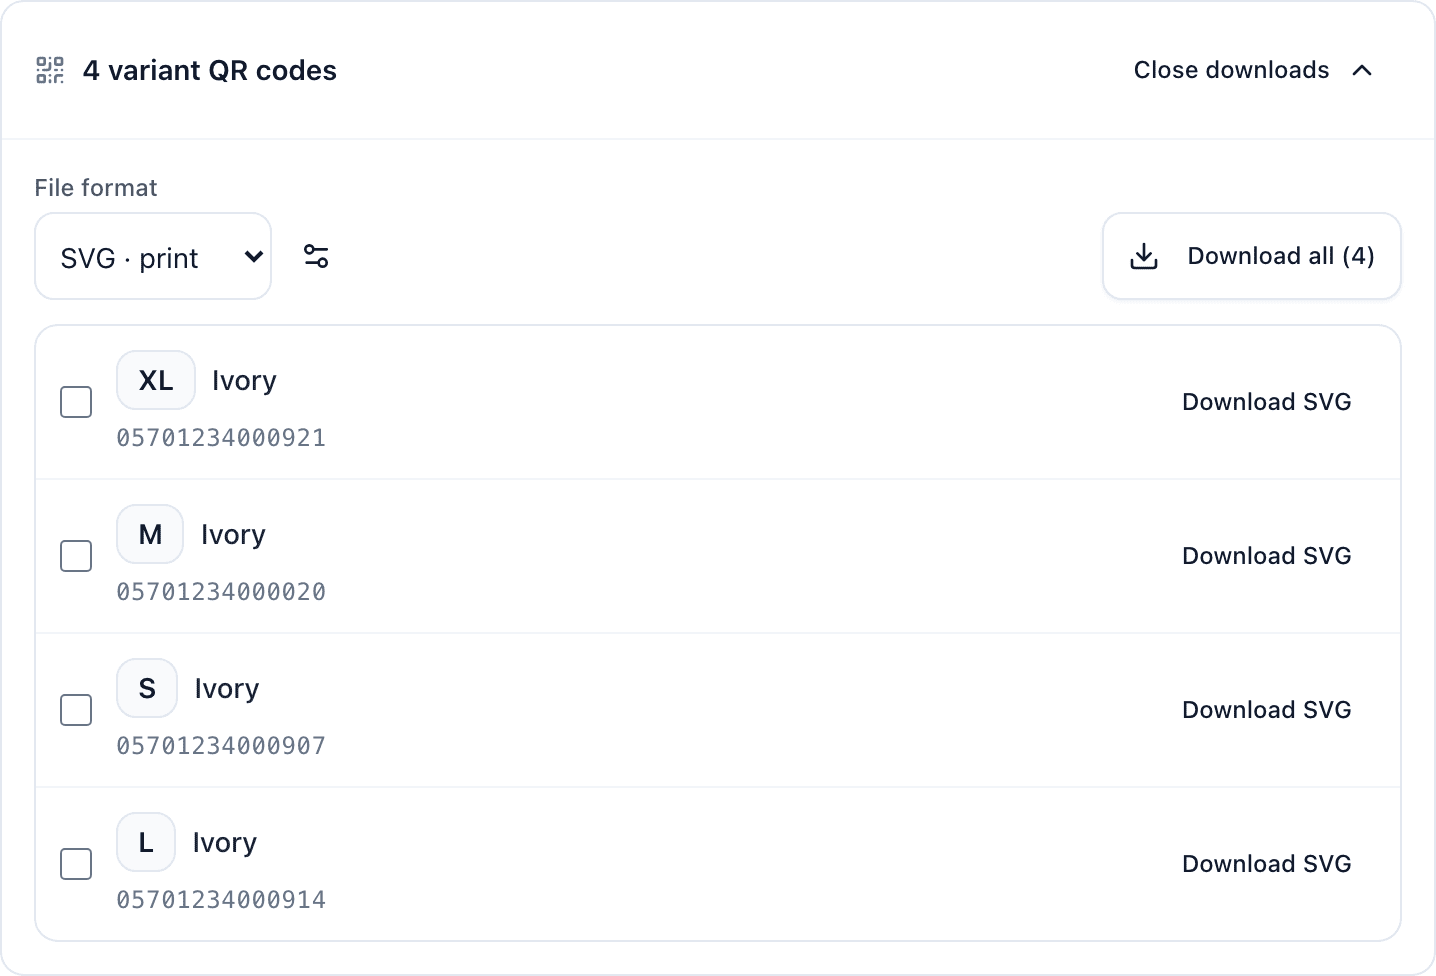
The ZIP is named after the product, for example linen-shirt-variant-qr-codes.zip. Inside, one image per entry is named after the product, size, colour and barcode, and manifest.csv lists each filename with its barcode, size, colour and the URL encoded in the code. Open the CSV with the barcode column set to text so leading zeroes are kept. "Your QR codes are ready." confirms the file was built.
Downloading does not publish
The section says it plainly for a draft: "Publish this passport before using these codes on product labels. Downloading does not publish it." You can prepare label artwork from a draft, but every code shows the not published yet notice until you publish.
What a scan shows
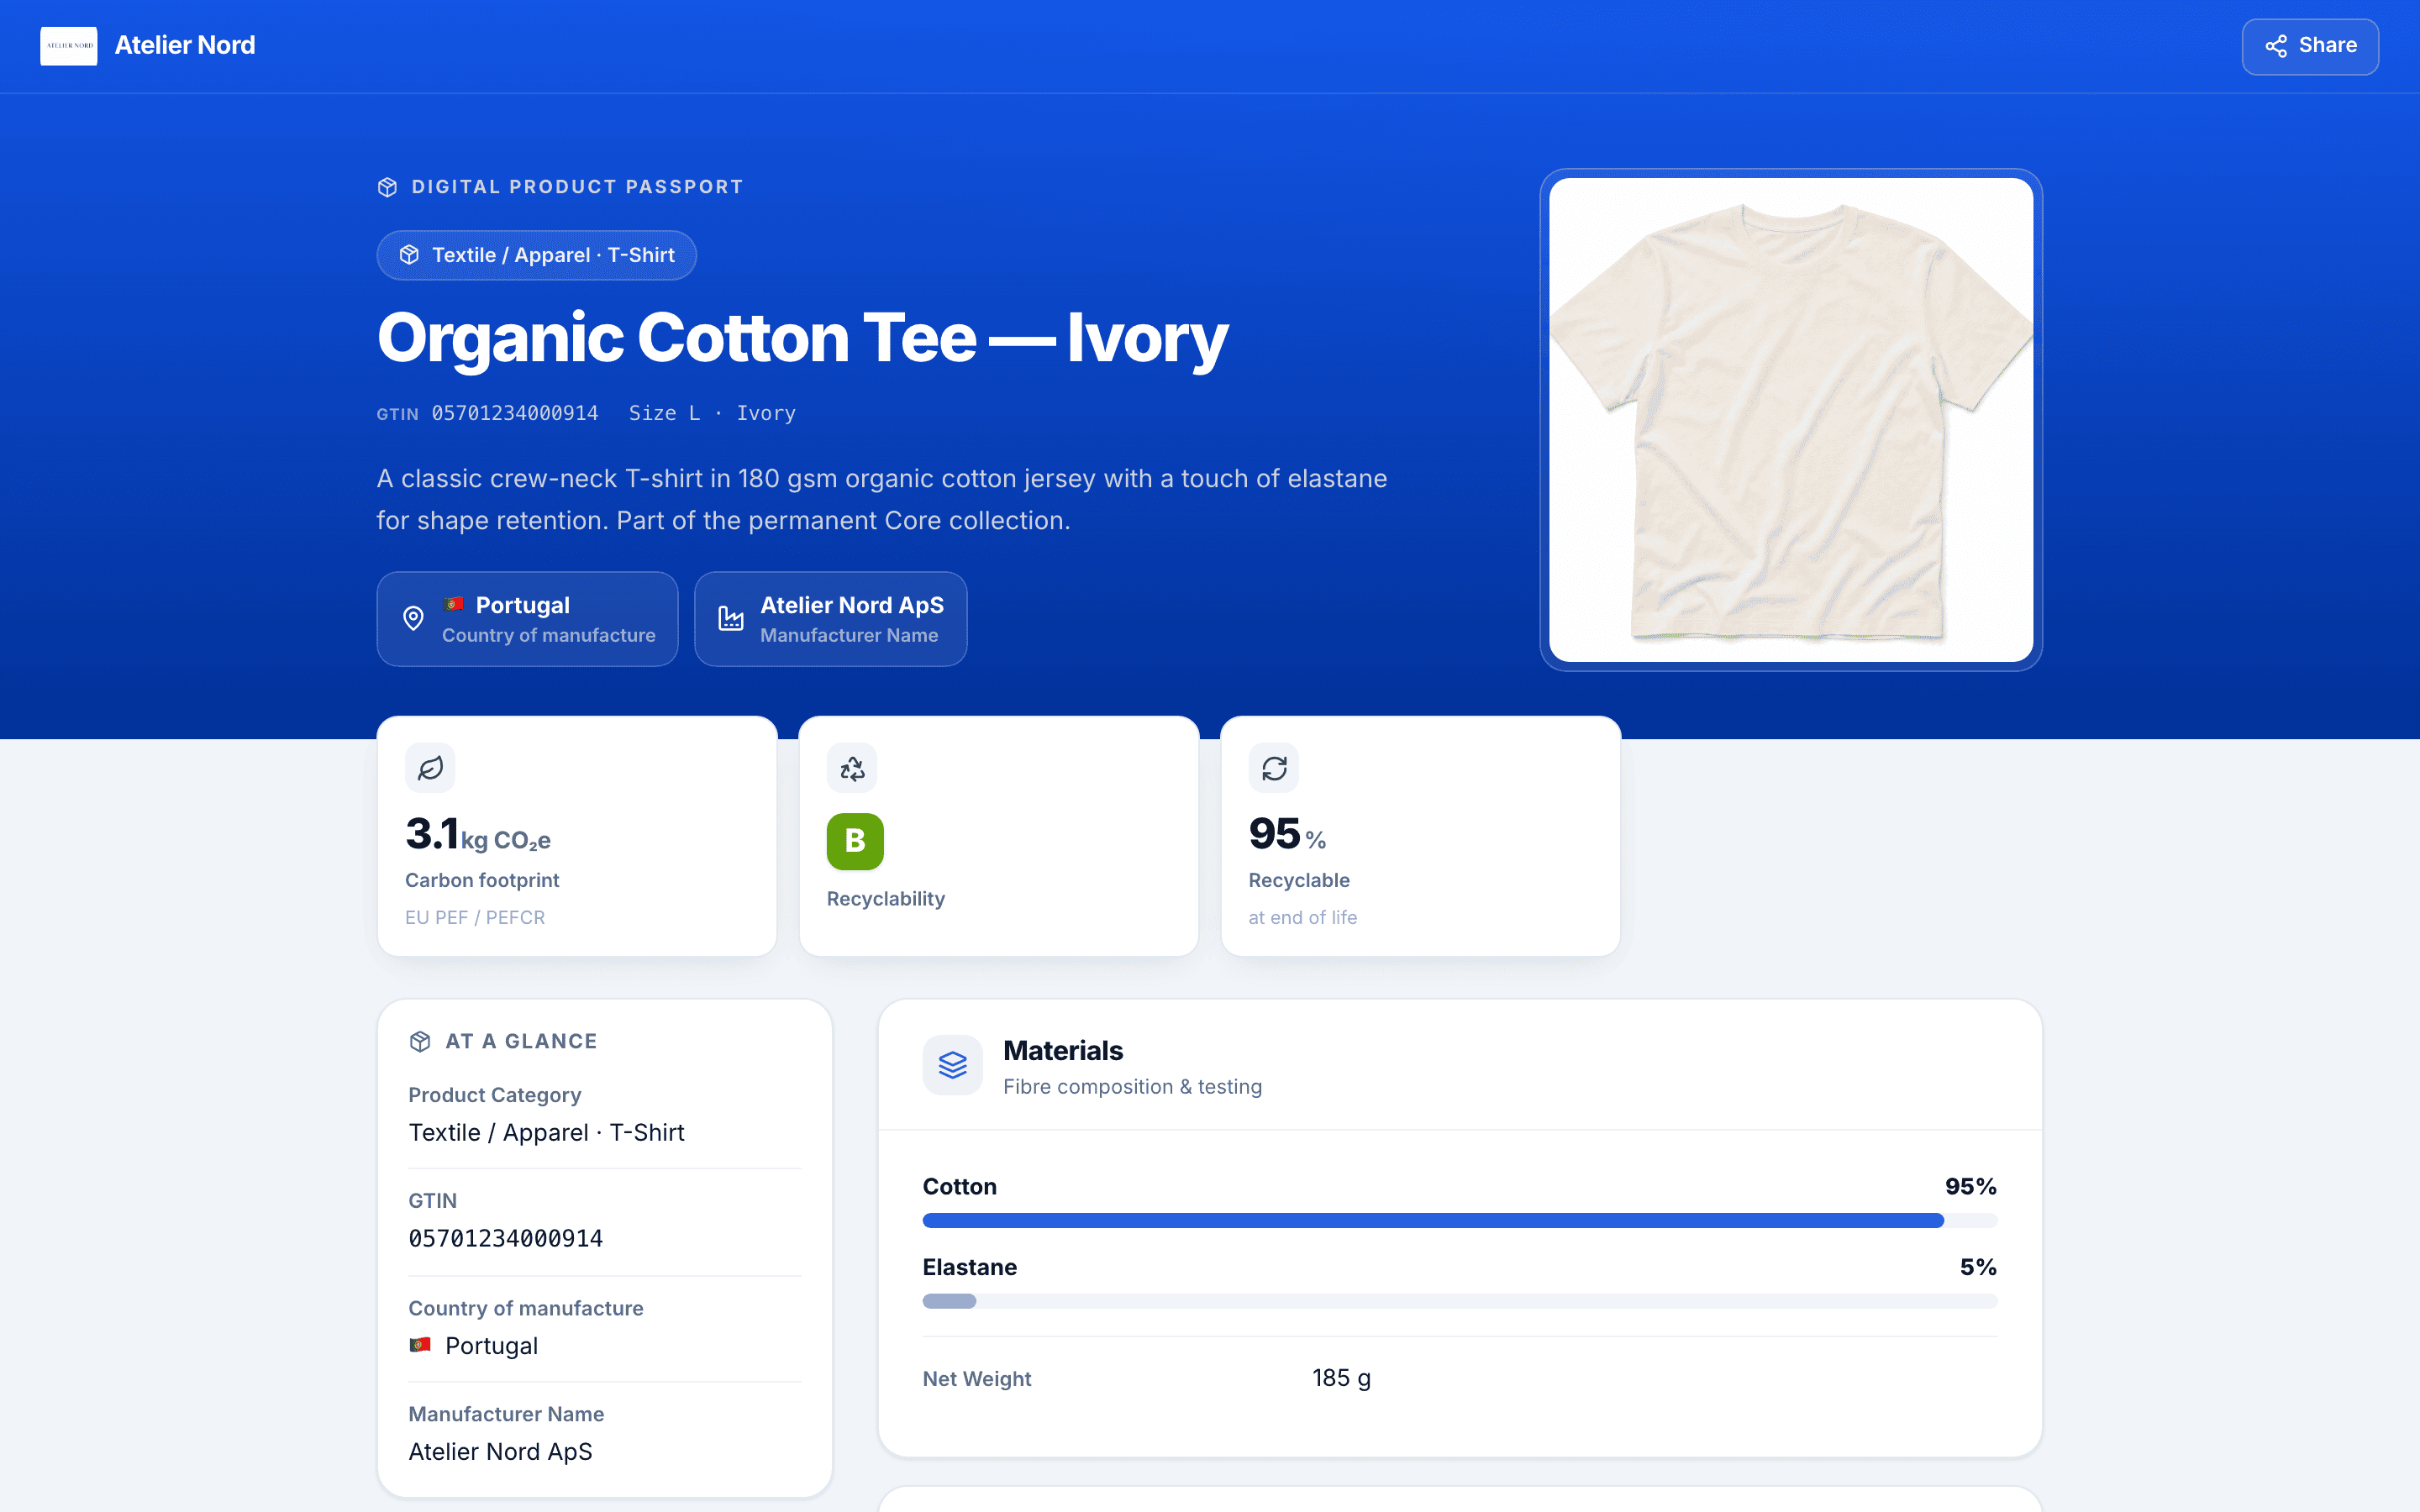
Every entry's QR code encodes passportcraft.com/01/{that entry's GTIN}. Scanning it opens the shared passport with the scanned size and colour named in the identity block, for example Size L · Ivory, and shows that barcode as the passport's GTIN. Scanning the passport's own barcode shows its size and colour in the same way. Nothing about the shared information changes between sizes, so you edit it once.
Publishing with sizes and colours
Publishing works as for any passport, with one addition: the passport still needs its own barcode, the one you identified in Product basics, plus every field marked To publish. A list of entries on its own does not satisfy that requirement. If entries change while a publish is in progress, publishing stops with "Sizes or colours changed while you were reviewing. Review them again before publishing." and the passport stays a draft; click Publish again. Publishing and unpublishing apply to the passport and all its entries at once; see Publishing a passport.
If your workspace has an assistant connected, it can read the list and add entries to a draft from the values you give it. Each such entry shows Written by your assistant with the connection's name, the publish dialog asks you to review those rows before they go live, and the assistant can neither remove entries nor publish. The same list and additions are available through the API.
Frequently asked questions
Do I need a separate passport for every size?
No. Sizes and colours that share the same product information live under one passport, and one passport is what your plan counts. Each size or colour keeps its own barcode, so a scan of any of them opens the shared passport and names the size and colour that was scanned.
Which barcode do I enter first?
The barcode of one actual size or colour. Choose Multiple sizes or colours in Product basics, enter that size and colour, and click Save this size and colour. There is no model-level barcode to invent and no first entry is treated as a default.
Are sizes and colours saved automatically like the rest of the passport?
No. Passport fields autosave as you type, but an entry is saved only when you click Add size or colour, Save this size and colour, or Add N entries. Text you have typed but not added stays in the panel until you leave the editor.
Does downloading the QR codes publish the passport?
No. You can download every code while the passport is a draft to prepare label artwork, but the codes lead to a 'not published yet' notice until you publish. Publishing needs the passport's own barcode, the one you identified in Product basics, plus every field marked To publish.